All of our shared and business servers run Litespeed Webserver - Our business servers, where we support Magento installations, also run LiteMage - which allows Magento to take advantage of LiteSpeed's caching. If you're running Magento we strongly advise you install and configure LiteMage to significantly improve the performance of your site.
What can LiteSpeed/LiteMage caching do for my site?
In really simple terms - caching makes your site super-fast for your visitors!
Typically without any kind of caching - when a visitor tries to view your site every component (image, text, scripts etc.) will be requested from the server, the page will be built and then served to your visitors' browser. This all takes time - and whilst it happens your visitor can be left waiting for something to appear on their screen. And we all know how frustrating it is to wait for stuff in a world where we now expect things to be quick! A slow site is likely to lose visitors - which could mean clients!
What caching does is keep a copy of that built page in memory - so further visitor requests for that page can be served near instantly from the cached version - with minimal impact on the server.
Ok, you may say - what about personalised pages - where there are client details or chunks of personalised information. Well, LiteMage can even handle that - it has a mechanism called Edge Side Includes (ESI) - which allows private data to be served within the publicly cached pages. This technique is called 'punching holes' in the public content. When that content is served again the bulk is served from the cache with the 'holes' being filled with the private individual content.
We typically see massive improvements from simply installing and enabling the LiteMage module with no further configuration. But take some time to configure all the options and your store should be lightning-fast - and that's good for business!
Installing the Magento LiteMage module
This guide describes how to install and activate the LiteMage module for Magento v1.
Pre-requisites to this guide:
You must have Magento installed and have Administrator access to activate caching after install
You need to be familiar with getting around a Linux system at the command prompt - if you're not it would be best to have a developer help you get this setup.
the PHP exec function must be enabled before you start the install and disabled again once you've finished. We have a separate guide on enabling PHP functions.
Add the following lines to your sites .htaccess file - this is normally found in your webroot (/public_html) folder. You can do this using cPanel file manager or if you're familiar with a Unix editor like nano, from the command prompt.
<IfModule Litespeed>
    LiteMage on
</IfModule>
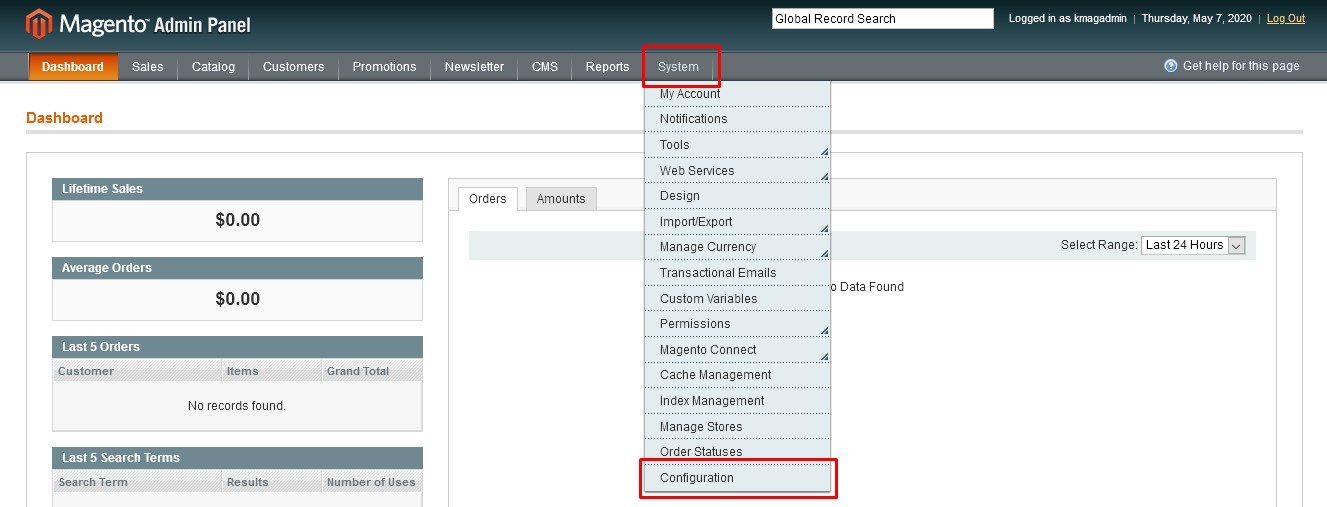
Log in to your Magento Admin panel
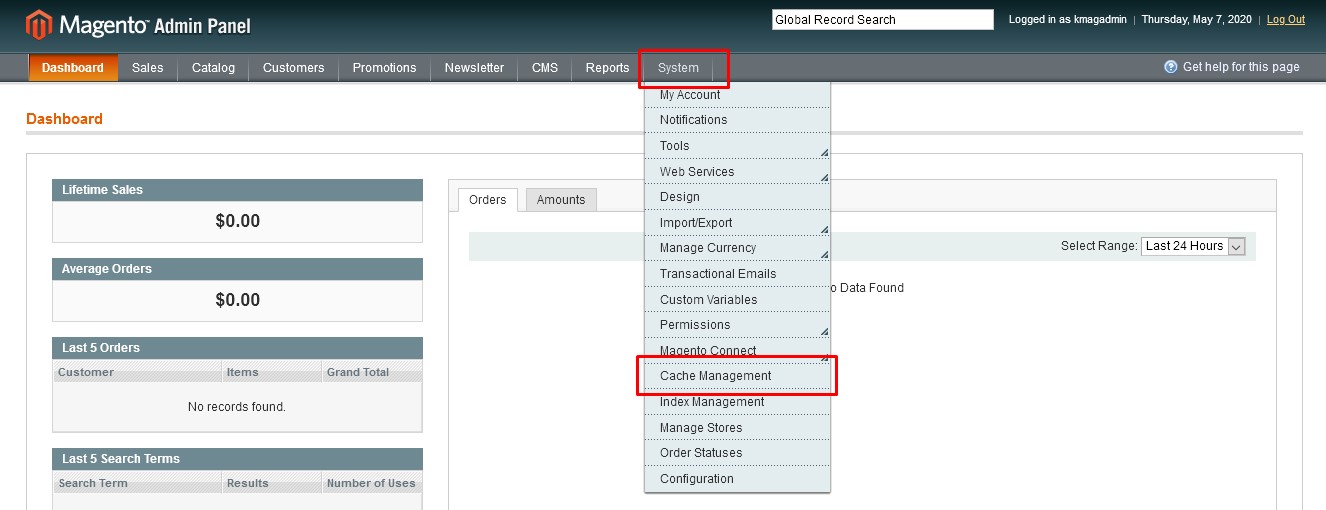
From the System top-bar menu select Configuration.
From the left-hand General menu select Web.Expand the Session Validation Settings section and change Use SID on Fronted to No. Click the Save Config button.
Disable Compilation if you have it enabled. Select System > Tools > Compilation from the top menu.Click the Disable button.
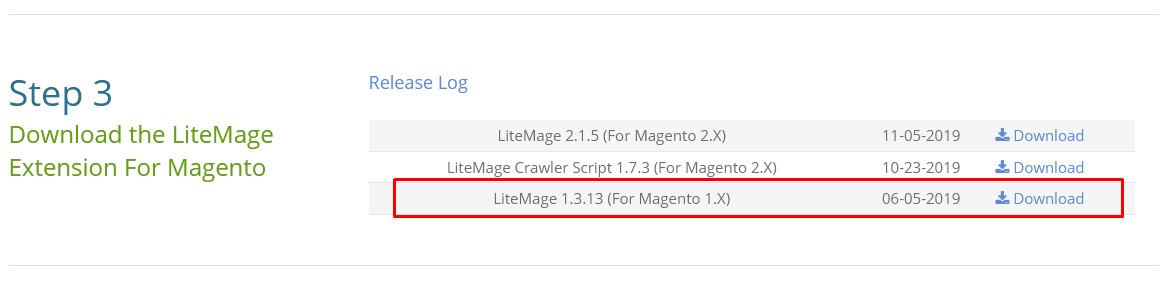
In this step, we will download and install the LiteMage plugin.
Download the LiteMage plugin (external link opens in a new window) - make sure to download the package for Magento 1.x
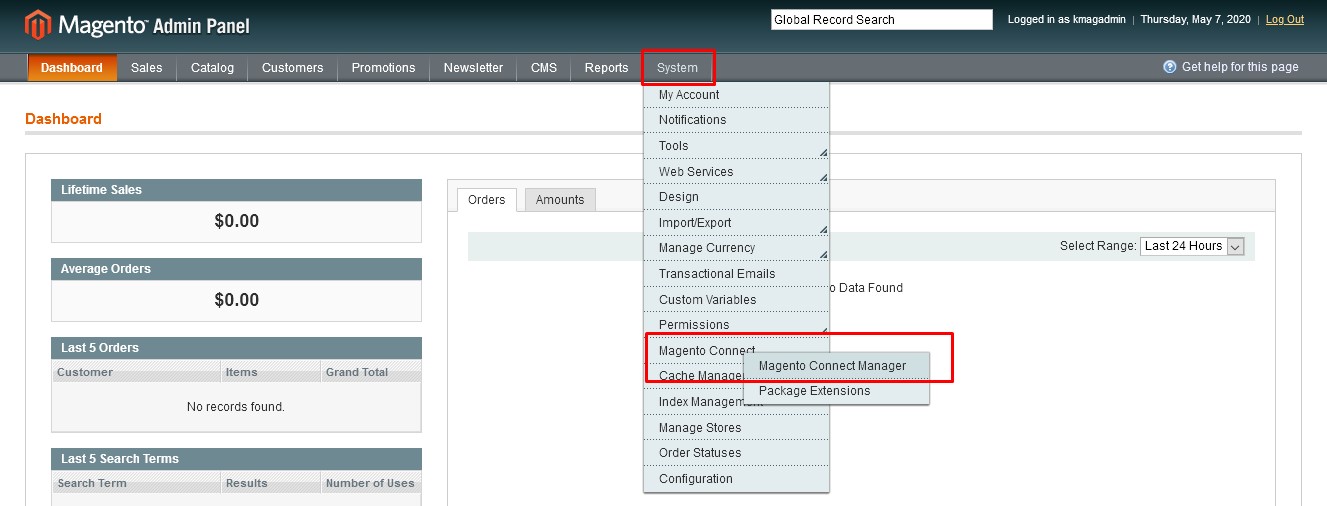
Open the Magento Connect Manager from System > Magento Connect > Magento Connect Manager.You'll be prompted to log in - re-enter your Magento administrator login details.
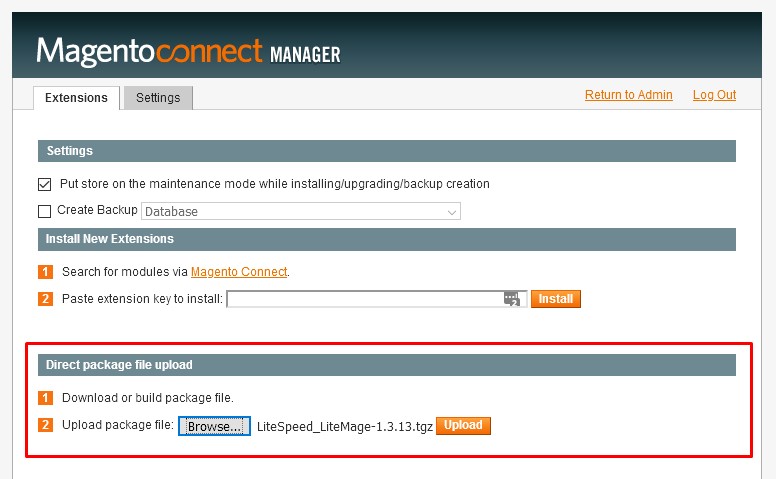
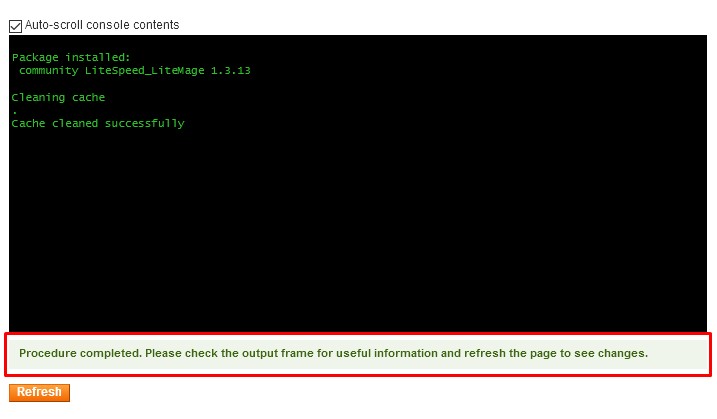
In the Direct package file upload section - click the Browse button and select the LiteMage package you just downloaded from your local file system. Then click the Install button.You should see a banner confirming the package has been installed and the procedure has completed.Scroll back to the top of the Magento Connect Manager and click the Return to Admin link.
You can now re-enable Compilation if you'd like to in System > Tools > Compilation. Click Run Compilation Process and then when that completes click Enable.
Navigate back to System > Configuration.
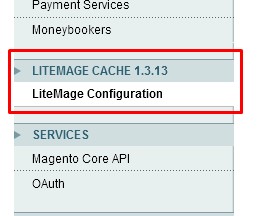
Click LiteMage Cache > LiteMage Configuration in the left-hand menu.Should you get a 404 error at this point simply log out and log back into the Magento Admin panel.
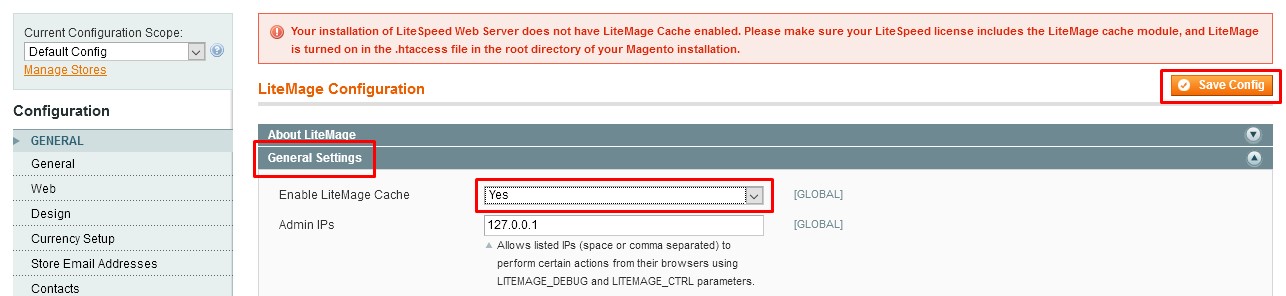
Expand General Settings and change Enable LiteMage Cache to Yes and click Save Config.
For testing purposes you can have LiteMage only serve cached pages for certain IP addresses.Expand the Developer Testing section and enter any external IP addresses you want to test from in the Enable LiteMage Cache Only for Listed IP's box. Click the Save Config button. You can visit View My IP (external link to Krystal View My IP opens in a new window) to see your current external IP address. Remove any IP addresses to enable caching to serve all visitors.
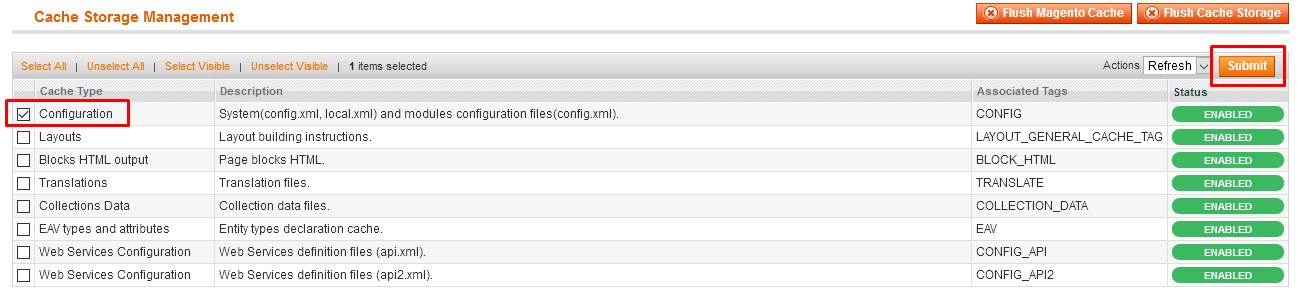
Navigate to System > Cache Management. Check the box next to Configuration and click the Submit button.
This completes the installation of LiteMage cache. The following section details how to confirm your site is being served correctly from the cache.
Verifying LiteMage functionality
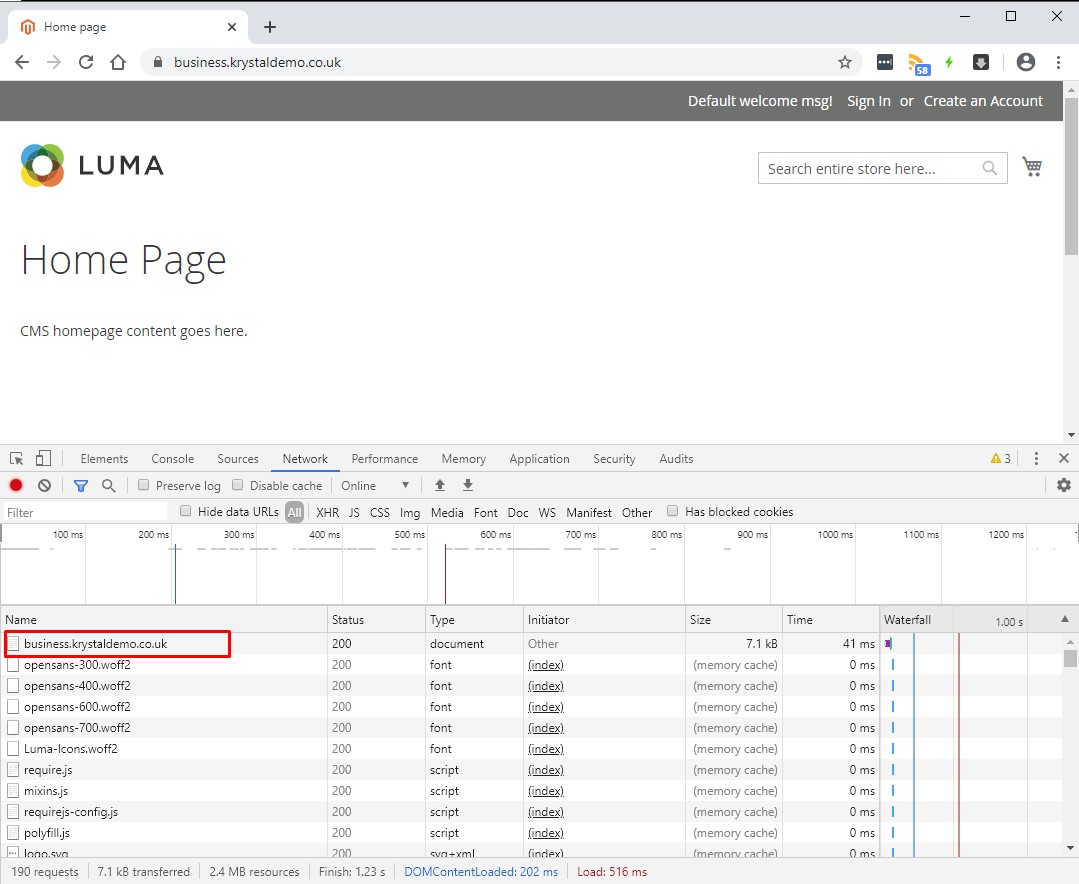
We can verify that pages of your store are being cached using your browsers developer or inspection tools.
Open your browsers developer tools and select the Network tab.
Visit your Magento site.
Scroll back to the first request (usually at the top of the list of files now in the Network tab.
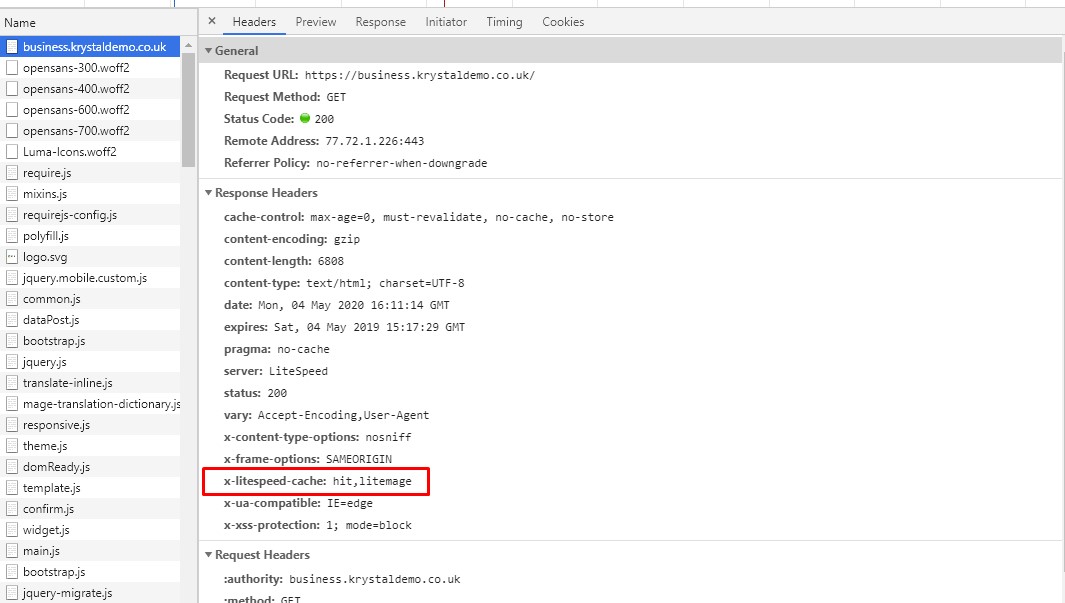
Clicking the item will normally allow viewing of the Headers.
If you see x-litespeed-cache:hit,litemage then LiteMage is working as expected. If you see x-litespeed-cache:miss,litemage then often the solution is simply to refresh your browser page.