Creating autoresponders using cPanel

You've likely interacted with many autoresponders in the past. Autoresponders have become one of the most important tools in any businesses arsenal as they are ideal for keeping customers informed without having to manually reply to each individual email saving you an enormous amount of time!
An autoresponder automatically creates and sends a reply to any email that is sent to a specific email address. This is most commonly used to let customers know you've received their enquiry without having to manually send a reply saving you time while still keeping your customers informed.
It's also helpful in the event you're not able to check your emails (I.e. on holiday) since you can easily let them know that you have received the message and you will reply when you return.
Creating an autoresponder via cPanel
cPanel includes the option to create an autoresponder by default. In order to set this up, you will have to be logged into your cPanel account (Link opens in a new tab) and have an existing email address (Link opens in a new tab)
- Log into cPanel
- Navigate to the "Email" header and click the "Autoresponders" option.
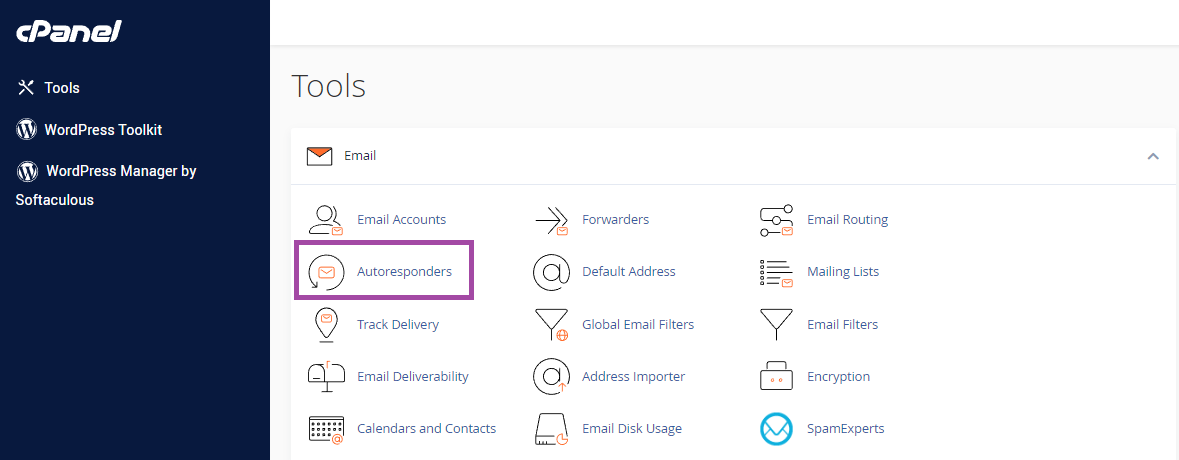
- Click on "Add Autoresponder"
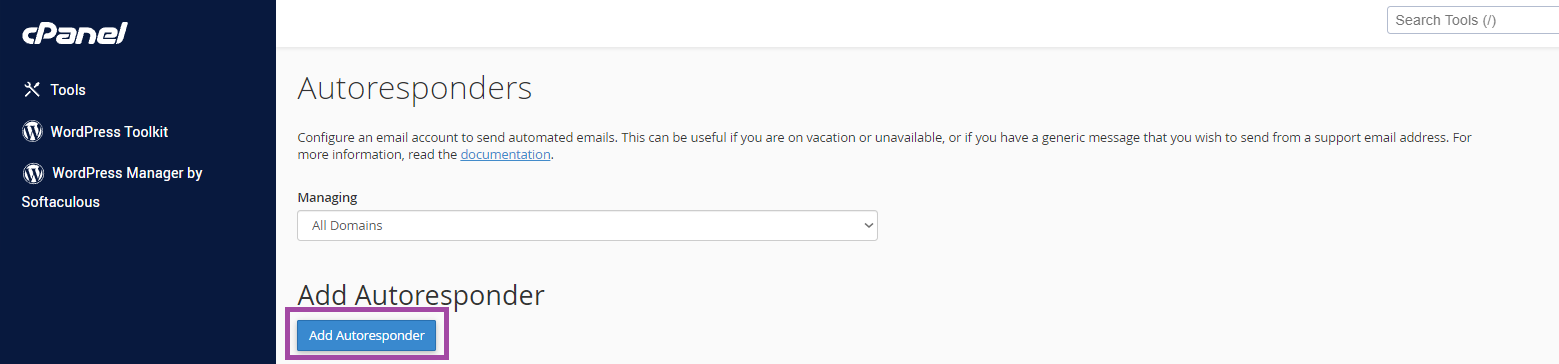
- Create your autoresponder
- Click "Create"

Autoresponder configuration options
Within the "Autoresponders" option, there are several configuration settings that you may wish to take advantage of.
Character Set:
This will normally be set to utf-8. We would suggest leaving this set to default however you can change it here should you wish.
Interval:
This option controls the number of hours to wait between responses tot he same email address. In the event the person contacting you also has an autoresponder set up, this could lead to flooding both of your inboxes with automatic replies. We generally suggest setting this to "1" to wait one hour between automatic replies to avoid this however if you wish you can change this to "0" to always reply.
Email:
This is the email address you are setting up the autoresponder for (I.E info)
Domain:
This option lets you decide the domain the autoresponder will be used for.
From:
This will let you choose the "From" address your reply will be sent from. We generally suggest matching this to the same email address you have entered in the "Email" option.
Subject:
This is where you select the subject line of the reply for example "Ben is out of the office".
HTML:
Select this option if you want HTML into the body of your email
Body:
Your autoresponder message will go here
Start:
This decides when your autoresponder begins replying. This can either be immediate or set to a specific date / time.
Stop:
This decides when your autoresponder stops replying. This can either be "Never" or a custom date / time.
Tags
cPanel's autoresponder includes several custom tags that you can include in the body of your reply:
%subject%:
The subject of the message sent to the autoresponder
%from%:
The name of the sender of the initial email received by the autoresponder if available.
%email%:
The incoming email sender's address.
Example of an autoresponder:
In this example, I we will create an "out of office" automatic reply to let our customers know that we have received their email but aren't currently available.
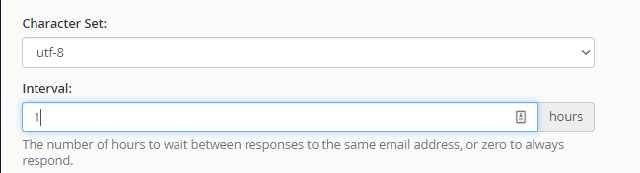
The character set has been set to default and the interval has been set to "1" to ensure that we do not get stuck in an autoresponder loop.
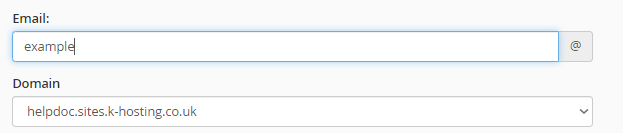
The email address that we want to create the autoresponder for is example@helpdoc.sites.k-hosting.co.uk. To achieve this, the "Email" section has been set to "example" and the domain to "helpdoc.sites.k-hosting.co.uk".
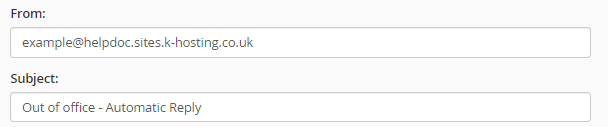
The from address has been set to match my email address, example@helpdoc.sites.k-hosting.co.uk and the subject has been set to "Out of office -Automatic Reply".

I have left HTML unchecked as I will not need to use HTML in the body of this email.

The body contains a brief message explaining that I have received their email and that I am on holiday from 10/10/2023 until 20/10/2023 and that I will reply on my return.
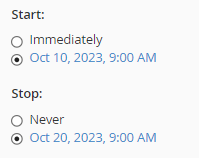
The email is set to start at 09:00 on 10/10/2023 and Stop at 09:00 on 20/10/2023.
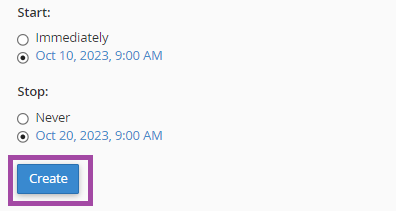
Now that the autoresponder is ready, clicking "Create" will add it to my autoresponders and it will begin working at the set date and time!